How to use this book

In this chapter
This is a technique book, not a training book. It assumes you already climb. You know the V-scale and can get up most V2s and V3s. Strength alone no longer explains why some problems go and others don’t. If you’re newer than that, the V0–V2 entries and guides are for you too. This book was written for one tall adult climber and now has a few notes for small climbers.
The book names the movements good climbers use and says how to do each one. Above all, it shows you how to recognise when a problem calls for one.
It is written for indoor bouldering. Rock, ropes and lead climbing come up only where they explain something about the gym.
How the book is organised
Part I explains the mechanics behind every technique: centre of gravity, straight arms, hips, and the direction a hold pulls. It also gives a step-by-step method for reading a problem before you touch it.
Part II is the catalogue, with one chapter per category: feet and legs, body positioning, hands and holds, dynamic movement, and terrain. Each chapter opens with a table that ranks its techniques by grade, and the entries follow in that order.
Part III has a guide for every grade from VB to V8+. Each guide says what indoor problems at that grade look like, which techniques start to matter and what to focus on. The step from V4 to V5 gets extra space.
Part IV covers your body (being tall, small or heavier, or starting as an adult), how to learn technique, and how to fall safely.
The appendices start with “On the mat”, the book on one page to look at between attempts. Then comes a troubleshooting table that goes from a symptom (“I swing off like a door”) to the techniques to try. They also hold a glossary of climbing jargon, an A–Z list of every technique name, a grade conversion table, the corrections to the previous edition, the sources and the index.
Anatomy of a technique entry
Every entry has the same parts:
- Name and grade badge. The badge, such as V3+, marks the grade where the technique starts to matter on indoor problems. Below that grade you can usually get away without it. Above it, more and more problems are set so that you need it. The grade is a judgement based on coaches’ advice, technique clinics and climbers’ reports, and gyms vary. If you should start learning the technique earlier, the Grade note says when.
- Also called. Other names you will hear. All of them are in the A–Z list and the index.
- How to do it. Numbered, concrete steps: which limb goes where, and why.
- When to use it — reading the wall. The shaded box has two groups. “Look for” lists what you can see on the wall before you climb. “Symptoms” lists what goes wrong when you needed the technique and didn’t use it.
- Common mistakes, notes for tall climbers and small climbers where there is something specific to say, related techniques, videos to watch, and sources.
- Referenced from. Every place in the book that mentions the technique, so you can jump back to it.
Finding your way around
Everything is linked:
- A technique name in italics, such as Drop knee, leads to its entry.
- A word with a dotted underline is climbing jargon. It leads to its definition in the glossary.
- A grade badge leads to the guide for that grade. The category name under an entry’s title leads to the ranked table at the start of its chapter.
- Numbers in square brackets, such as [12], lead to the sources.
- The top of every page links to the contents, the A–Z list, the troubleshooting table, the glossary and the index. The chapter name beside them leads to the start of the chapter.
- Search finds any word in the book: press / or use Search at the top of the page. Hover over a technique, a dotted word or a source number to see what it leads to. On a touch screen, the first tap shows it.
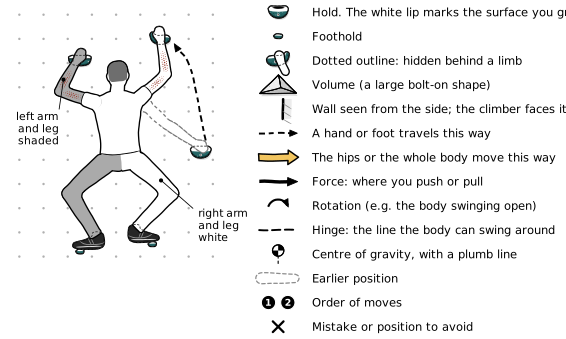
Reading the illustrations
Most illustrations show the climber from behind, facing the wall, as you would see a friend from the mats. Side views show the wall on the right, with the climber facing it.
A word on safety
Bouldering falls are short but frequent. Some techniques load joints in unusual ways, e.g. full crimps, heel hooks, drop knees and dynos; their entries say how. Chapter 9 covers injuries, warming up and falling. Back off any move that hurts.