Chapter Three
Feet and legs

In this chapter
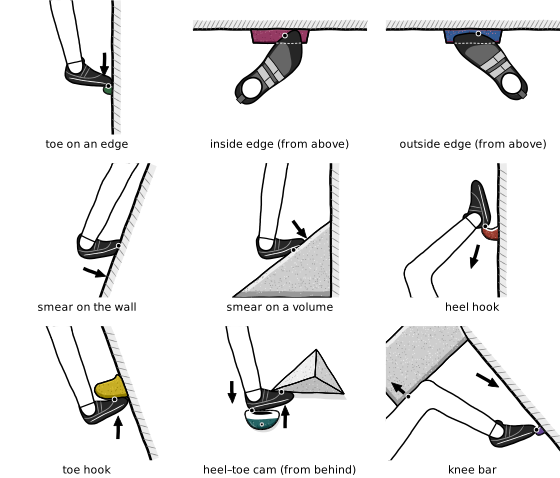
Your legs are much stronger than your arms. Every bit of weight your feet hold is weight your fingers don’t carry [3]. The chapter runs from standing on a foothold to the hooks and locks that keep you on steep ground.
The early entries look basic, but you can’t skip them. Around V3, climbers find that gym problems stop letting them pull through on their arms [76]. From then on, your feet decide whether a move goes. The later entries build on the early ones: a toe hook fails if you place the other foot carelessly.
No public syllabus ties footwork to grades [77], so this chapter’s grades are judgement. They draw on gym clinics, coaches’ fault lists and climbers’ reports [35, 76, 78, 79].
| Grade | Technique |
|---|---|
| V0 | Precise footwork |
| V0 | Edging |
| V1 | Front-pointing |
| V1 | Smearing |
| V1 | High step |
| V1 | Rockover |
| V2 | Pivoting |
| V2 | Foot swap |
| Grade | Technique |
|---|---|
| V2 | Hand–foot match |
| V3 | Pulling with the toes |
| V3 | Heel hook |
| V4 | Toe hook |
| V5 | Bicycle |
| V5 | Heel–toe cam |
| V5 | Knee bar |
3.1 Feet first
Most climbers plan the hands and let the feet follow. Turn that round. These rules come from coaches:
- Let the legs do the work. Overhangs are the exception, where the arms do more. Push with one foot at a time, as on a ladder [3].
- Your hands decide your feet. When your left hand lets go, your right hand holds you: stand on your left foot, and the other way round. That is the diagonal from Chapter 1: the hand that stays on and the foot you stand on are on opposite sides [80].
- Choose foot height by the next reach. Look for a foothold that puts the next handhold just within reach. That is usually at knee height or lower. High footholds feel secure but cost energy [80].
- Move your feet often. To notice lazy feet, try a drill from one how-to article: make three foot placements for every hand move, using any footholds you need [81]. Try it on an easy climb first (this book’s suggestion). It’s a practice drill, not a target for your hard problems. Use small in-between footholds instead of one big step [82, 83].
- Read the feet before you start. Trace a path for your feet to the crux (the hardest move), not just for your hands. Chapter 2 (step 5) shows how.
- Remember your feet. On a problem you work over several goes, the commonest error is changing your feet [80].
- When it gets hard, look down. Focus on your feet exactly when you start to struggle [84].
Drill: climb down your warm-up problems. Let the feet lead and lower yourself with your legs [81, 85].
Symptoms that you are climbing hands-first:
- You arrive at a hold at full stretch with your feet below your knees.
- You keep scanning for handholds [35].
- You can’t repeat a move you did last go [80].
3.2 From foothold to technique
Use this table while you read a problem from the mat.
| What you see | Try first | Entry |
|---|---|---|
| A small edge in front of you on a vertical or leaning-back wall | Inside edge, front of the shoe | Edging |
| A foothold across your body’s centre line; a steep wall; a sidepull for the hand | Outside edge, hip turned in | Edging |
| A pocket, a hole or a small ledge facing straight out | Point the toe in | Front-pointing |
| Blank wall, a slab, the face of a volume (a big hollow shape bolted to the wall), a rounded foothold | Smear with the heel low | Smearing |
| You need the other foot on the hold you stand on | Swap feet, or flag instead | Foot swap |
| A big foothold at hip height or higher; poor handholds | High step, then rock over | High step |
| A ledge you already push down on with one hand | Put the foot beside the hand | Hand–foot match |
| An edge at waist height or above, out to the side | Heel hook | Heel hook |
| The underside of a hold near your middle; you swing open when a hand lets go | Toe hook | Toe hook |
| One big hold whose top and underside you can both reach | Clamp it with both feet | Bicycle |
| A slot about one foot long between a hold and a feature above it | Lock heel and toe | Heel–toe cam |
| A foothold and a flat surface about one shin length apart | Wedge the knee | Knee bar |
| A steep wall with small footholds; feet popping as you reach | Pull with the toes | Pulling with the toes |
| The next foothold is far away; a roof with no footholds past its edge | Let the feet go, under control | Cutting loose and swing control |
3.3 Shoes
Only the shoe points that change technique are here. They come from coaches, not from tests.
- Downturned shoes curl the toe down like a claw. They help you pull with the toes on steep walls and in pockets [35, 86, 87].
- Stiff shoes hold you up on small edges for longer but give less feel. Soft shoes smear better and let you feel the hold [86, 88]. Gresham says a softer shoe may be enough for bouldering [86].
- For toe hooks, choose shoes with rubber over the top of the toes [87, 89]. Velcro shoes and slippers hold toe hooks better than lace-ups [90].
- For heel hooks, the heel must fit with no empty space. Tighten the straps fully [91, 92].
- Fit: snug, with no air pockets, but not painful [93].