Chapter Two
Reading a problem

In this chapter
Reading a problem (an indoor boulder route) means working out how to climb it before you touch it. You find the start and the finish. You decide which hand goes on which hold, where your feet go and where it will get hard. Then you rehearse it in your head.
Good readers don’t guess better. They have a method and compare what they read with moves they have already done. This chapter gives you that method, then covers planning attempts, resting between them and reading gym grades.
2.1 Why read first
- Reading changes how you climb. In one study, 29 male climbers on roped indoor routes had three minutes to look at some routes before they climbed them. Looking didn’t change how often they reached the top, but they did make fewer and shorter stops. Part of that held up once the authors allowed for ability, with the experts gaining most [24].
- Experts read in chunks. Expert climbers describe moving from the whole route to the details. They split it into sections and mark the hard parts and the rests. They look for “traps”: places where arriving with the wrong hand forces a fall [25].
- You read with the moves you know. Experts remembered the holds of a hard route better than novices, though on easy routes there was no difference [26]. In a virtual climbing task, novices also made more short-sighted plans, picking nearby holds that weren’t part of the right sequence [27]. Earlier studies suggest that experts see more readily what a hold can be used for [28].
- Good climbers take time over it. In the qualification and semi-final rounds of one 2018 World Cup, boulderers looked for about 50 seconds before their first attempt [29].
You can’t read a move you have never felt, so every new move you learn on the wall makes you a better reader.
2.2 The method, step by step
Run these steps at the bottom of every problem you want to climb first try. On a warm-up, steps 1 to 3 are enough. A companion booklet, Reading the Wall: Exercises, has eight drawn problems to practise on.
Step 1 Rules and boundaries
- Use only holds of the problem’s colour or tape [30].
- Find the start. Most gyms mark it with extra tape, a coloured box or the grade tag. Put your hands on the start hold or holds [30].
- Some rules vary between gyms. Can both hands share one start hold? Must your feet use marked holds? Do volumes (big hollow shapes bolted to the wall) count? Volumes often count for every problem on that wall [31]. If in doubt, ask the staff [32].
- A sit start is usually marked on the tag. Find out whether you must be still on the start holds before you move (judgement).
- Find the finish. It is either a marked top hold or a top-out onto the top of the wall [30]. Most gyms expect both hands on the top hold, under control (judgement).
- Find the way down before you start [30, 33].
Step 2 Stand back, then walk around
- Look from several angles and from well back, so you see bulges and the top [34, 35].
- Get close to the base of the wall to spot underclings (holds you pull upward). Stand to the side to see sidepulls and edges angled into the wall [34].
- Read the top too, because tunnel vision is worst there [34]. You may think the hardest move is low down, only to fail at the top [33].
Step 3 Read each hold’s direction
Work out which way each hold faces and where that puts your body (the next section explains how). Chalk on a hold shows where people grip it, but watch out for false marks from people who used it wrongly [34, 36].
Step 4 Count the hands
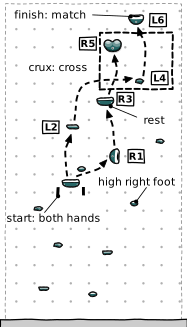
- Number the handholds from the start to the finish.
- Give each hold an L or an R from its direction (step 3).
- Check the order. If two holds in a row need the same hand, you can match (put both hands on one hold), cross (move one hand over the other) or move the same hand twice (judgement).
- Where you can’t decide, list the options in order: cross, match or go again. Choose when you feel the holds [34].
- Pick two or three marker holds: big, easy-to-remember holds that anchor the sequence. The rest hangs off them [34].
- Expect at least one move that is not a straight ladder. Setters use matches, crosses, underclings and sidepulls even on easy problems [37]. They also use left–right sequences to force a particular movement [38].
Step 5 Find the feet
- Holds with rubber marks and no chalk are probably footholds [34, 36].
- On steep ground, look for footholds you can use with the outside edge of the shoe. Under roofs, look for heel hooks and toe hooks [34].
- Look for moves where a side flag saves you swapping feet twice in a row [34, 39].
- Read the feet together with the hands, because the next hand move depends on where your feet are [25].
- Don’t try to plan every foot. The coach Neil Gresham says the full foot sequence is the hardest part to predict [34]. At V3–V4, plan the feet for the start and the hardest move. Sort out the rest on the wall (judgement).
Step 6 Find the crux, the traps and the rests
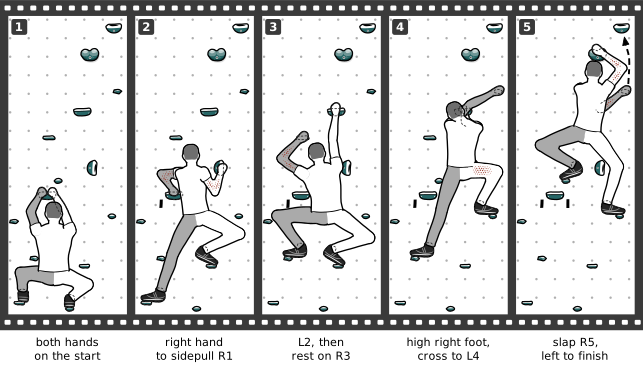
- The crux is the hardest move or section. It may be a jump, a balance move, a move where your feet come off, or small holds [40]. Decide how you will do it before you start [40].
- Find the traps, where the wrong hand forces a fall. Expect some near the start (judgement).
- Rests are places to shake out (hang on one arm and shake the other). Look for big holds and ledges, and on harder problems knee bars and heel hooks [34, 40, 41].
- Split the problem into sections at the crux and at changes of style, such as overhang to slab. Don’t try to memorise every move [41].
Step 7 Guess what the setter intended
Section 2.5 lists what setters say they do. Ask yourself what movement this problem is testing.
Step 8 Rehearse
- Go through the problem slowly in your head, then again. Gresham suggests two run-throughs for the hand sequence, three when you add rests and four with feet [34].
- Mime the moves with your hands while you stand in front of the wall, as competitors do [40, 41].
- Picture yourself at the crux. One expert memorised the size and shape of each crux so he knew how to position himself when he got there [25].
- Give complex sequences short cue words: “cross, flag, match” [41].
Step 9 Climb, then compare
- On the wall, notice where the plan works and where it doesn’t [40].
- Back on the mat, compare what you predicted with what happened. Coaches see this review as the way to get better at reading [34, 35, 40].
- When you fall, name the reason: a hold you misjudged, a lost sequence or a surprise [36].
2.3 Hold direction and body position
This table applies the rule from Chapter 1 to each kind of hold. Use it on every hold of a new problem.
| Hold | Faces | Where your body goes | Which hand, and the cue |
|---|---|---|---|
| Jug or edge | Up | Below it. Pull down. | Either hand. Hips under it, arm straight on steep ground. |
| Sidepull | Away from your body | On the side you pull towards. Lean away from the hold and turn a hip in [40, 42]. | The hand on the hold’s side. A hold on your left facing left takes the left hand. Your body goes to its right. |
| Gaston | Towards your middle | Stay close to it. Push it away from you with the elbow out and the thumb down [42]. | A hold on your right facing left takes the right hand. |
| Undercling | Down | Rise until it sits at your waist. Pull up with your feet high [42]. | Best at waist or chest height. Stand up into it. |
| Sloper | No edge | Stay low, with your centre of gravity (your balance point) below the hold. Keep the arm straight [35, 43]. | Move the hips first when you go sideways [35]. |
| Volume face | Any direction | Put your feet on the far side, hips over them [43, 44]. | Press with a palm. Grip edges with a “meat hook”: palm on one face, fingers over the other [43]. |
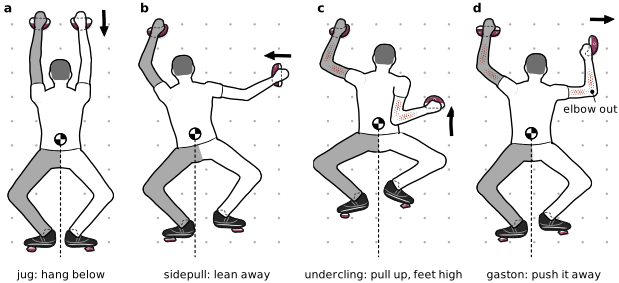
A hold that faces the “wrong” way for the hand you planned tells you that you need the other hand, a cross or a different body position. The hand techniques are in Chapter 5.
2.4 What to read first on each kind of wall
Each kind of terrain hides its key information in a different place, so read that first.
| Terrain | Read this first |
|---|---|
| Slab technique | The feet. Find the best part of each foothold and the smears between them. Handholds only steer you [45, 46]. |
| Overhangs | Footholds below and to the side of the handholds. They tell you where to turn your hip in [35, 47]. |
| Roofs | The backs and sides of holds, where toes and heels can hook [48, 49]. |
| Arêtes | Which sections use only the edge and which use face holds [50]. |
| Corners | Footholds, or blank wall, on both walls [51]. |
| Volumes | The far side of each volume, its edges and the gaps between volumes [35, 43]. |
| Dynamic slab | The end position of each jump. Read the problem from the top down [44, 52]. |
| Top-outs | The shape of the lip (the top edge of the wall) and the way down [33, 53]. |
2.5 What the setter had in mind
A setter (the person who designs the problems) starts from a brief: who the problem is for, its grade, the movement it uses and how much effort it takes [54]. Some gyms also ask which skills a problem tests and what share of members should finish it [55]. Knowing how setters think helps you find the intended sequence.
Climbers often find a sequence the setter didn’t expect [56]. On comp-style problems (jumpy, competition-like), read from the top down. Use chalk marks, thumbprints and shoe marks as clues [44].
What setters say they do:
- They avoid ladders. Easier problems get matches and crosses too, and sometimes an easy heel hook or dyno [37, 57]. Harder ones get intricate sequences, big slopers, or big holds with small footholds [37].
- They force body positions. Setters remove footholds or put the one useful foothold far to one side, which makes you think about balance [38].
2.6 Other people’s beta, and reading for your size
Beta is the sequence of moves for a problem. Watching other climbers, asking for advice and talking it over are normal tools [40, 41]. Apps such as Kaya also collect beta [41]. Beta from others has limits, though.
- Your body changes the beta. Height and arm span strongly affect how a problem feels, so adapt moves to your body [40].
- Size is more than reach. Tall climbers may get bunched up, short climbers may not reach, and climbers with small hands may not hold wide pinches or slopers well [37].
- Look for micro beta. These are small changes to how you grip and stand, tailored to your size and strength [58].
- Read before you watch. Make your plan first, then watch someone climb the problem and compare (judgement).
2.7 Flash or project?
To flash a problem is to climb it on your first try. To project it is to work on it over several attempts or sessions. The two need different tactics.
Flashing. In a study of the 2019 World Cup finals, the first attempt on a steep problem succeeded about 21% of the time. The rate fell with each try, to 6% on the fifth, and the authors call the first attempt a finalist’s best chance there. On slab and slab-like problems the rate rose, from about 15% on the first to 22% on the second and third. The authors ran no statistical test on these rates and warn that skill probably skews them, because better climbers finish earlier. Finalists also rest very little, about 30 seconds between tries [65]. The climbers still trying after a failed attempt tend to be those the problem suits least, so these rates can’t show that your own chance falls after one try (judgement).
You only get one flash and your arms are at their freshest, so on steep problems put everything into the first try (judgement). On slab, a failed first try costs you less (judgement).
Your flash routine, built from the steps above:
- Run steps 1–8. Spend about a minute looking.
- Mime the crux.
- Rest fully.
- Climb at a steady pace. Don’t stop on the wall to re-read.
Projecting. Choose a project no more than two or three grades above what you usually climb in a session [58]. Then:
- Learn the single moves first, in isolation. Get the first contact right before you add the second [44]. Then link the crux (climb its moves without stopping), then longer sections [66, 67].
- Split the problem at the crux, the rests and the changes of style. Work on one link or one move at a time [41, 68].
- Link through the crux and keep going. Big overlapping links show progress better than your high point from the start [66].
- Practise the easy parts too, because slapping through them wastes energy you need later [58, 66].
- Count good attempts and treat each one as information. Decide how many you can make in a day [68].
- Keep one or two side projects so you stay fresh [68].
The six-attempt figure comes from elite competition. In the 2019 World Cup finals, only one climber finished a problem after a sixth attempt. On steep problems the fifth attempt, after four failures, succeeded only 6% of the time. The authors treat six as a cut-off and say they can’t name an ideal number [65]. The climbers still trying by then tend to be those the problem suits least, and they rest little between tries, so treat four to six as a rule of thumb (judgement).
2.8 Rest between attempts
How long to rest depends on how hard the attempt is. Problems below your limit need a minute or so. The long rests are for attempts at your limit, on a problem you’re projecting or a move you can only just do. If you rest too little before them, you train a different energy system [69].
| Situation | Rest | Source |
|---|---|---|
| Easier problems, climbed for endurance | 30–60 seconds between sets | [69] |
| A hard problem climbed several times in a row | 1–3 times the climbing time, e.g. about a minute after 30 seconds | [69] |
| One move at your limit, tried on its own (a few seconds) | About 2½ minutes after a 3-second try. The rule is 20–50 times the effort time. | [69] |
| A full attempt at your limit (about 30 seconds) | 10–15 minutes | [69] |
| Projecting any physically hard problem | At least 5 minutes, and 10–25 minutes for a long one | [58] |
| What competitors actually do under a time limit | About 2 minutes (a national event, 2010 study); about 30 seconds (a World Cup and the World Championship final, 2018) | [29, 70] |
So an hour at your limit holds only about four to six full attempts, each made at full strength. Most sessions mix the two: a few limit attempts while you’re fresh, and easier problems with short rests (this book’s suggestion). The 2018 competition figure describes athletes with four or five minutes per problem. Neither competition figure is advice. While you rest, watch others try your problem.
2.9 When to change the beta
- When your sessions keep running into dead ends, question the sequence [58].
- When you are stuck or a move feels impossible, find your own beta for each move before you ask others, then test new versions [40, 66].
- After each fall, name the cause (step 9). If it is the sequence, find an easier one. If it is strength, keep the sequence and train [36, 58].
- Try something new on every attempt, even on familiar moves: a different foot or a different grip [66].
- Change the sequence sooner than the four-to-six rule when you fail at the same point, in the same way, on three fresh attempts in a row. Change it too when the move only works for climbers of a very different size (judgement).
2.10 Indoor grades
A grade tells you how hard a problem is meant to be. Indoor grades are a useful guide but a poor measure. Gyms use the V-scale (the US scale, from VB and V0 up) or the Font scale (the European scale, from 3 up). The conversion table is in the appendix (Grade conversion).
How a gym grade is made. The setter usually suggests a grade after a try or two and may adjust it after asking other setters or climbers [71]. Some gyms grade by consensus: their setters forerun (test-climb) each other’s problems and agree a grade [72]. Forerunning is where setters tweak a problem until it fits the intended grade [37]. One gym writer disagrees, saying that gym grades rarely get feedback and that modern gyms don’t grade by consensus [64]. Both are probably true at different gyms.
One setter says what matters most is consistency. A gym can grade hard or easy compared with outdoor rock, as long as its grades stay the same as problems come and go. Regulars then adapt to that gym [37].
Why grades differ between gyms.
- The spread is large. An analysis of 40 US gyms found grades differing by two to four V-grades between gyms. The author reckons a solid V4 climber could expect anything from V2 to V6, depending on the gym [73]. It is a blog analysis by a gym-listing website’s founder, not a peer-reviewed study.
- Gym type and walls. Large commercial chains graded about one V-grade softer (easier for the number) than gyms focused on training. Steep gyms graded harder, while gyms with lots of slab or competition-style setting graded softer [73].
- Many beginners. Gyms offer many easy problems and tend to soften the lower grades instead of splitting them. That softness can reach the middle grades too [74].
- Style and sequence. Slab, overhang and dynamic problems test different skills. One awkward move can make a whole problem feel harder. A setter’s energy on the day plays a part, as does beta the setter didn’t expect [56].
- Your body. Height, reach, finger size and style all change how a grade feels [37, 64, 74].
We found no peer-reviewed study of indoor grade consistency.
Colours and circuits. Some walls group problems into a circuit: a colour that covers one grade or a range of two or three [32]. One aim is to play down grades and encourage you to try everything. Colour ranges often overlap, so a problem in a harder colour isn’t always harder [75]. Two US gyms use five colours each, such as V0–V2, V2–V4, V4–V6, V6–V8 and V8 and up [55]. Some gyms use colours with no V-grades at all, or their own scales [74]. UK walls mostly use Font or V-grades for bouldering [32].
Calibrating yourself in a new gym.
- Ask the staff how their system works and how it compares with standard grades [32, 75].
- Warm up three or four grades below your maximum. Start below your limit while you learn the gym’s style [73, 75].
- In the first week, climb as many problems as you can in 15 minutes, two grades below your usual maximum. Repeat every two weeks and compare the counts between gyms [73].
- Pick one reference problem at your home gym for each style: steep overhang, small edges, slab, jumps and squeezing. After three or four sessions, compare the new gym’s problems with them [73].
- Keep track of which problems you climb reliably and which feel harder or easier for your body [64].