Chapter Five
Hands and holds

In this chapter
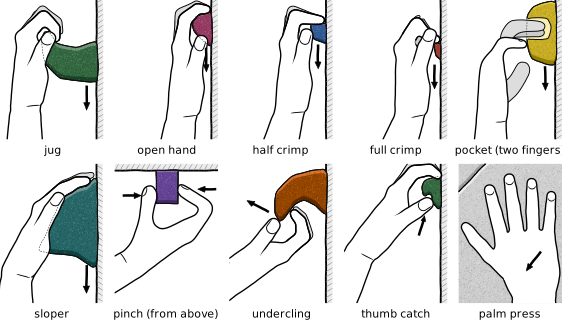
This chapter covers what your hands do on each kind of hold and where each hold puts your body. That second part matters more, because at V3–V4 a fall from a decent hold often means your body was in the wrong place [158, 159].
Each grade marks where indoor problems start to demand the technique. No coaching scheme ties grips to V-grades; the UK’s NICAS award teaches hold types at its third level [160]. So the grades here are judgement calls. Each grade note says why.
The heavier you are, the more load your fingers carry. The force on your finger pulleys (the bands that hold the tendons against the bone) rises with that load [161, 162]. The entries on the crimp (a grip with the fingers sharply bent) say how to keep it down.
| Grade | Technique |
|---|---|
| V0 | Jug |
| V1 | Sidepull |
| V2 | Half crimp |
| V2 | Open hand |
| V2 | Undercling |
| V2 | Palming |
| V2 | Mantle |
| V3 | Sloper |
| Grade | Technique |
|---|---|
| V3 | Pinch |
| V3 | Wrapping |
| V3 | Gaston |
| V3 | Re-gripping and adjusting |
| V4 | |
| V4 | Using the thumb |
| V5 | Full crimp |
5.1 Every hold has a direction
Pull each hold opposite to the way its gripping surface faces. Chapter 1 explains why. Chapter 2 has a table of where your body goes for each hold.
German school climbing lessons turn this into a drill: students mark each hold’s best pulling direction with a strip of tape, then climb so the forearm lies along the tape [158].
The same lessons name two warning signs of a wrong direction:
- You slip off suddenly from a hold that felt fine. Move your body until you can lean into the hold. Get more of your hand on it.
- Your forearms pump on easy holds. (Pump is the hard, tired, swollen feeling in the forearm.) You are squeezing to make up for a bad angle, so move your body instead and grip only as hard as you need.
A straight arm is a quick check, because an arm that hangs straight points along the pull.
How well a hold works changes as you move. A sloper that holds while your hips are low rolls off as they rise. An undercling gets better as you climb above it [9, 163]. So ask where your hips will be when you need each hold. Where they are when you first touch it matters less.
5.2 Positive and negative holds
A positive hold has a gripping surface that faces up or tilts back into the wall. That tilt is called an incut. Your fingers hook behind it and lock on by shape. A negative hold slopes down and away from the wall, so part of your pull runs along the surface and friction (the grip of skin on the surface) has to keep you on [158].
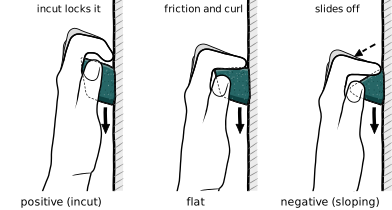
Lab tests show how fast small sloping holds get worse [164]. Eight strong climbers pulled as hard as they could on edges (narrow ledges) 1–4 cm deep, tilted from flat to 40°.
- On 3–4 cm edges, a 30° slope made no real difference. Only 40° cut their force.
- On 1–2 cm edges, their force dropped once the slope passed 20°.
- They chose a half crimp on the 1–2 cm edges and an open hand on the deeper ones.
So a small hold that slopes is worse than a small flat one or a big sloping one.
The same hold can be positive or negative, depending on how the setter (the person who designs the problems) bolted it on. Some modern holds and volumes (big hollow shapes bolted to the wall) have two finishes: a grippy texture marks where you should hold, and a smooth finish marks where you shouldn’t. This is called dual texture [165]. Read the grippy patch as an instruction, because the smooth part can turn a big, easy hold into one that needs precise movement [166].
5.3 Contact strength and grip endurance
Two different things can run out in your fingers. Contact strength is how fast you can squeeze hard at the moment you grab a hold. You need it to slap a rounded hold or catch a small edge on the move. If you touch the hold but can’t stay on it, this is what failed. Grip endurance is how long you can keep gripping. If you fall on the last moves with pumped forearms, this is what failed.
Technique cuts both demands, because a hold loaded in its own direction needs less squeeze [158] and a lighter grip costs less. A German teaching drill trains this: load a hold, then ease off until you are only just holding on [158].