Chapter One
How movement works

In this chapter
Every technique in this book solves one of a few mechanical problems. How do you keep your weight over your feet? How do you hang without wasting strength? How do you stop your body rotating off the wall? How do you put your body where a hold wants it? Once you understand these ideas, the named techniques stop looking like a long list. You can predict which one a problem needs.
1.1 Centre of gravity and base of support
Your centre of gravity is the point your weight acts through. When you stand upright, it sits in your pelvis, near your navel [1], but it moves when you bend, reach or raise a leg. Gravity pulls straight down through it. Picture a plumb line hanging from it: the line shows at a glance where your weight goes.
Your base of support is the set of points holding you: footholds, handholds, a knee or a heel. On the ground it is the area between your feet. On a wall, ask where the plumb line falls:
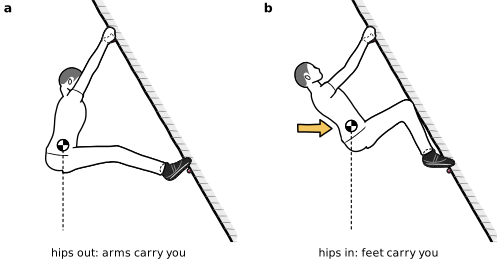
- If the plumb line falls over or between your footholds, your feet carry your weight and your hands only stop you falling backwards, which costs little grip [2, 3].
- If the plumb line falls outside your feet, your fingers must hold you up and in [2, 4]. Every second in that position costs strength.
The steeper the wall, the more weight moves from your feet to your hands. Measurements show this even between a slight slab and a slight overhang [2]. So the first question for any position is: where is my weight, and what carries it? Most footwork and body-positioning techniques move your hips so the answer is “my feet”.
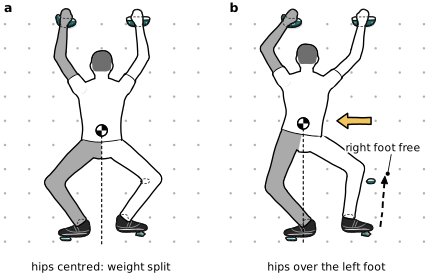
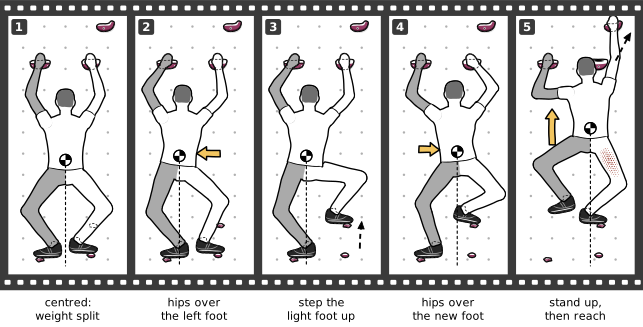
Good climbers share a rhythm: shift the hips first, then move the limb [5]. Before you lift a foot, move your hips over the other foot. Before you reach, move your hips under or beside the hold you reach from, so the reach doesn’t drag your weight off your feet. Expert climbers shift their weight from side to side more than novices do [6]. Weight shift, Precise footwork, Foot swap and slab climbing all depend on this.
1.2 Straight arms: hang on your skeleton
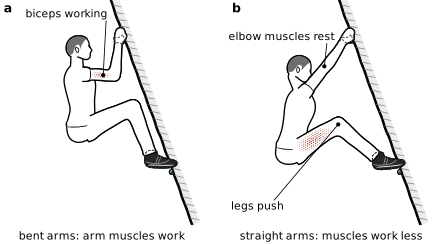
Muscle holds a bent arm bent. Lock your elbow at ninety degrees and your biceps and shoulder muscles work all the time [7]. Straighten the arm and your elbow muscles can rest [8, 9]. Coaches talk about hanging on your skeleton [5, 8], but as a physiotherapist points out, you always are: the saving comes from using fewer muscles and using them less hard [10]. Your shoulder muscles must still hold the joint in place [10]. So learn straight arms early (this book’s suggestion). The UK’s coach training lists them as a way to find a rest [11].
On long problems your forearms pump: they swell, ache and weaken. Coaches recommend hanging on straight arms whenever you aren’t pulling, to ease the pump [5, 12], but we found no study measuring this. The closest study tested 12-second hangs with the feet off the wall: the biceps and shoulder muscles worked harder on bent arms, while the one forearm muscle it tested, a finger flexor, showed no change [7]. It measured no pump, so it says little about a real climb (this book’s reading). Straight arms also force you to move with your legs, because a straight arm can’t pull.
Straight arms are not a rule for every moment. You bend your arms to pull through a move or to lock off. On steep ground the skill is to straighten them again as soon as the move is done. Then set up the next move with straight arms: move the feet, turn the hips.
1.3 Hips and the wall
How far your hips are from the wall decides how much weight goes through your feet. The right distance depends on the wall angle.
- On an overhang, your feet are below and in front of you, while gravity pulls your hips away from the wall. The further they sag, the more your feet slide off and the more your arms carry [1, 4]. Bring your hips in, square or with one hip to the wall, to move your weight towards your toes [13]. Pulling with your toes helps too: both press your feet onto the holds. See Turning the hip in, Pulling with the toes and Overhangs.
- On a vertical wall, stand tall, with your body straight and over your feet [3]. Don’t sink low to straighten your arms: it moves weight off your feet onto your fingers [2].
- On a slab, where the wall leans away from you, hugging it pushes your feet off the holds. Stand straight over your feet with your hips slightly away from the wall, so your weight presses down through your shoes [3]. See Slab technique.
“Hips in” does not mean “as tight as you can”. Pulling in too tight on an overhang blocks your turn and unloads your feet [14]. On a test wall, expert climbers held their centre of gravity slightly farther from the wall than novices did [6].
1.4 Holds have a direction
A hold is not just “good” or “bad”. It has a surface you can pull on, which only works when you pull away from the way it faces. A jug works from below. An undercling works from above, pulling upward. A sidepull whose gripping edge faces left works when your body is to its right, leaning away from it. Used with your body on its left, the same hold becomes a gaston. A sloper works only when your body hangs below it, arm straight [15]. So the holds dictate where your body goes.
This is the most useful idea for reading problems. Look at which way every hold faces, then ask where your body must be for each hold to work. Chapter 2 turns this into a method, and Chapter 5 describes each hold type.
Three kinds of force come out of this:
- Pulling, towards you or downward, as on a jug.
- Pushing, as when you press a palm on a volume or mantle onto a ledge.
- Opposition: two forces pushing or pulling against each other. Two hands squeeze a block (Compression). A hand pulls one way while a foot pushes the other (Layback). Your feet push apart in a corner (Stemming). With opposition, holds that are useless on their own start to work [11, 16]. See Opposition.
1.5 Rotation and the barn door
Hang from two points, say your left hand and your left foot. Your body can rotate around the line between them, like a door on its hinges. If your centre of gravity sits to the side of that hinge, gravity swings your body open [2]. This is the barn door, which explains many falls that seem to have no cause.
Every fix for a barn door does one of these things [17–19]:
- Put weight or a contact on the far side of the hinge. Press your free foot on the wall there, even without a hold. If the free leg is already on that side, that is a side flag. If not, cross it behind (Back flag) or in front (Inside flag) [20].
- Move your centre of gravity onto the hinge. Shift your hips over the standing foot.
- Change the hinge. Swap feet so the hand and foot you use are on opposite sides: left hand with right foot. That diagonal resists rotation [17]. A backstep or drop knee does this with your hips turned in.
- Beat the swing. Move fast enough that the rotation has no time to build [19].
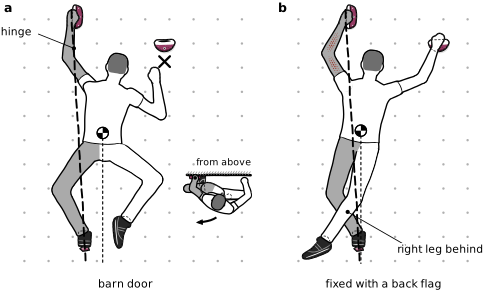
A good default for any move is the diagonal: opposite hand and foot [17]. When a problem forces same-side hand and foot, expect to need one of these fixes.
1.6 Static and dynamic
A static move is one you could stop at any point: your body stays in balance throughout. A dynamic move uses momentum: you move fast enough that your hand reaches the next hold before you have time to fall. Static movement is precise and controllable. Dynamic movement can save energy compared with a hard lock-off, according to one gym owner’s article [21]. It is the only option when the next hold is out of static reach. From about V3 indoors you need both, and much of the skill lies in choosing. Chapter 6 covers the dynamic side, starting with the deadpoint.
1.7 Tension: connecting hands and feet
On steep ground your trunk connects your hands to your feet. If your trunk is slack, your feet swing off when you move a hand, however good the footholds are. Body tension is the skill of pulling your feet into the wall with the muscles of your trunk, hips and legs [22], so that your body acts as one rigid piece between the holds. The physiotherapist Jason Hooper argues that this is mostly technique and coordination, not raw core strength [23]. Tension is why good climbers can stand on tiny footholds on an overhang, and why heel hooks and toe hooks work: they pull your body in.
1.8 Three questions for every move
Ask these on the ground before you pull on, and again whenever you fall off. The answers point straight to a technique. The troubleshooting appendix lists techniques by symptom.