Chapter Nine
Your body and how you learn

In this chapter
The technique chapters describe moves for an average body. This chapter is about yours, if you are tall, small or heavier than the average climber, or if you started as an adult. Each of these changes which problems feel hard and how much load your fingers can take. It also changes how you should warm up, practise and fall.
Some advice here rests on studies, some on coaches and climbing federations, and some is judgement. The text says which. “This book’s suggestion” marks our own judgement.
9.1 Climbing tall
What height does and doesn’t predict
Height decides which problems feel easy or hard. Its effect on your grade is less clear. One study scored 44 climbers on two indoor routes of 11 and 30 m, not on boulder problems. A factor the authors labelled training explained 58.9% of the differences in their scores. Body measurements, such as height, arm span and weight, explained 0.3%. Self-rated grade and years of climbing also went into the analysis, so the training factor may partly measure experience [270]. In a study of 41 climbers, from novice to elite, what the authors call trainable variables explained 46%, and body shape and muscle together under 4% [271].
Not every study agrees. Elite Polish boulderers differed from non-climbers in arm span and lean body mass, among other measures [272]. A 2007 study found arm span relative to height a useful predictor [273]. Adam Ondra puts the average competition climber at about 170 cm for men and 160 cm for women. In his view, tall climbers gain reach but usually lack the body and finger strength of shorter ones [274].
Your ape index is your arm span minus your height. In surveys of American men, arm span averages 3–4% more than height [273]. Measure your span fingertip to fingertip, arms out, back against a wall. Then measure your standing reach: one arm straight up, feet flat, side to the wall. Your standing reach tells you whether a move is a reach for you.
Where height helps and where it hurts
Height helps most on easy problems. You can skip intermediates (small holds between two good ones) and reach moves that shorter climbers have to jump. On forums, climbers report that this advantage fades at intermediate grades, by about V6 [275, 276]. That is anecdote, but a common one.
From about V3–V4 on, expect these problems to feel harder than their grade:
- Scrunchy problems, where the holds are close together and you have to fold up. Your knees hit the wall or your chest, which pushes your hips out. Tall forum climbers name this as their weak style [275, 276]. See Turning the hip in.
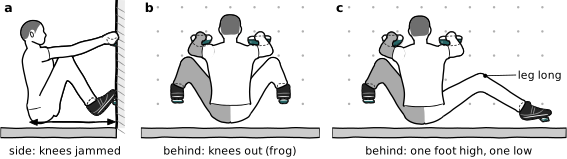
- Sit starts. Long thighs put your knees in your chest and your bum far from the wall (Figure 95 a). See Sit starts.
- High feet. A foot at waist height needs your knee fully bent and your hip deeply folded. That position can hurt your knee (see the box below).
- Steep walls. Your hips hang further from the holds than a short climber’s. When your feet come off, more weight swings further out.
- Big moves where your feet come off. Forum climbers say tall climbers find the swing harder to hold [275, 276].
How to climb tall
Most of this list is this book’s suggestion, built on the mechanics in Chapter 1. No study has tested it.
- Fold sideways, not forwards. On a scrunchy move, turn your hip into the wall with a backstep or a partial drop knee. Your long thigh then points along the wall instead of into it.
- Skip high footholds. If the next foothold is at knee height, try a lower one with a straighter leg. When you must step high, see High step and Rockover.
- Sit starts. Sit as close to the wall as the start holds allow. Place both feet before you take the holds. Then turn side-on with an outside edge on the foothold, as in Sit starts. Where both footholds sit straight below the holds, open your knees wide in a frog position instead, so your chest drops between them. Or put one foot high and one low, so only one knee comes up (Figure 95 b, c). Pull your hips in with your feet to lift off. Don’t heave on straight arms.
- On vertical walls, use your reach. On steep walls, keep your hips close: every centimetre they sag puts more weight on your fingers.
- Copy positions, not sequences. Ondra recommends climbing with people of different heights [274]. Watch where short climbers put their hips and knees on scrunchy problems.
- Seek out your weak style. Sit starts and scrunchy problems are your best practice.
Mobility
You need three hip movements: knees turned out for frogs and high steps, knee to chest for high feet, and knee turned in for drop knees. Heel hooks also need flexible hamstrings (the muscles at the back of the thigh). Lattice tells beginners that hip flexibility improves their movement [277]. Try a wide squat with hip circles and a kneeling stretch for the front of the hip. A frog stretch on forearms and knees and the yoga pigeon pose also help [278]. But flexibility explained only 1.8% of the differences in score in the study of 44 climbers [270]. It opens positions, but this study gives no sign that it adds grades.
9.2 Climbing small
What height does and doesn’t predict
Being small changes which problems feel hard. Its effect on your grade is less clear, because studies of height point both ways [279]. In a V0–V8 competition, height and body mass didn’t help predict 67 boulderers’ scores, while ring-finger strength, experience and how often they bouldered did [280].
What height may change is how strong your fingers are at a given grade. In a 2017 podcast, Lattice reported that among over 500 clients, shorter climbers at the same grade had stronger fingers, by about 2.5% per 10 cm. Its coaches say these climbers need that strength, whatever they weigh [281]. One blogger argues instead that strength relative to bodyweight comes more easily to a shorter body, though he has no test of this [282]. We found no published version of the 2.5%. Lattice’s written post on height, about a different test, calls its own correlation not strong [283].
Lattice says its result holds whatever the grade [281], while forum climbers (Section 9.1) say height’s advantage fades by about V6. The two may not clash (judgement): the forums mean reach on the wall and Lattice means how strong your fingers test, though its coaches think reach explains part of that gap [281]. Both are weak evidence, so don’t plan your training around either (this book’s suggestion).
Where being small helps and hurts
One columnist, writing about an outdoor slab, thinks a short reach hurts most on vertical walls with big moves between good holds [284]. Indoors, one head setter (a person who designs gym problems) admits that a lot of setting is built for the average man’s body [246]. By climbers’ own accounts, being small helps on sit starts [284], high feet [60] and tight knee bars [61, 227], and perhaps on steep walls [227]. If you are also light, each finger carries less load (judgement), but don’t chase a lower weight (Section 9.3).
How to climb small
We found no study that tests these points. They come from climbers and coaches of about 150 to 170 cm who work around their own reach. Much of the advice comes from rock. The sources give no shared figure for how short counts as small, so take what fits you.
- Add moves where the problem lets you. Split a long move with a small hold or a high foot [59]. Indoors there aren’t always more options [60], though some setters add a small hold for this reason [246].
- Raise your feet. Walk them up on tiny footholds [62] or use a high heel hook [61]. Read the knee box in Section 9.1 first, because heel hooks caused the most injuries in its study.
- Turn in. Where the holds suit it, bring your hip to the wall with a backstep [59, 61].
- Learn momentum in small steps [226]. On easy problems, go for deadpoints to holds just out of reach [106], low on the wall at first [147]. Keep big jumps for the moves that need them (this book’s suggestion), and don’t snatch at small holds, which can injure a finger [161].
Small hands
One setter says small hands can’t use wide pinches and slopers as securely as large ones [37]. You may be able to hold a wide pinch like an edge [180], or pull it as a sidepull (this book’s suggestion). We found no study of hand size on small holds. The nearest is a test of 48 people hanging from a 4 cm edge, where longer middle fingers went with shorter hangs. But only 10 of them had climbing experience, and a 4 cm edge isn’t small [285].
9.3 Climbing heavier
Why weight matters for your fingers
Your fingers carry whatever weight your feet don’t. On a vertical wall with good footholds, your feet carry most of it. On a steep wall, your hands carry more. When a foot slips, your hands take all of it, plus the jolt. The heavier you are, the more force each finger takes in the same position. This is plain mechanics, not a study.
Your finger tissues adapt to that load. Among high-level climbers, the thickness of the palmar plate (the tough ligament on the palm side of each finger joint) was linked to body weight [286]. But this tissue adapts slowly (Section 9.4).
So your best way to save your fingers is to keep your weight on your feet. Every foot slip or readjustment costs you more than it costs a lighter climber.
Footwork first
- Stand on the best part of the foothold with the front of your shoe, not the middle of your foot [287]. Place each foot silently and don’t adjust it once it’s down. See Precise footwork and the drills in Section 9.5.
- Move your hips over your feet before you move a hand.
- Climb with control while your fingers are still adapting. Small deadpoints are fine, but keep big jumps for the moves that need them and don’t snatch at small holds (this book’s suggestion).
- On steep ground, use toe hooks and heel hooks so a leg takes some weight.
- Climb down instead of dropping from the top: a heavier body hits the mat harder (Section 9.6).
On step 3: one gym owner’s article says dynamic moves save energy compared with locking off (Chapter 6), but that says nothing about the load on your fingers. In a small indoor study of 35 climbers, six reported a shoulder that felt it might slip out, badly enough to need at least two weeks off. Those climbers more often preferred a dynamic style, but they also had less experience. The study didn’t separate small deadpoints from big jumps. The result is uncertain, and one snapshot can’t show that the style caused it [288].
Does weight cost you grades?
Nobody has tested this for climbers like you. Studies of weight and climbing compare different climbers at one moment, so they can’t say what happens when one climber loses weight. The 0.3% to 4% that body shape explained in Section 9.1 come from that kind of comparison [270, 271]. We found no trial of weight loss in climbers, and a recent paper on competition climbers says there are none. It also points out that the climbers studied are much alike, so the results probably don’t apply to someone carrying more body fat than athletes usually do [289].
The reviews differ. One found the evidence on body mass and body fat conflicting. It concluded that body measurements seem to count less than strength and endurance [279]. Another says heavier climbers tend to climb lower grades on routes and that successful climbers carry less body fat. But its own pooled figures show no significant difference in body fat, and it finds no clear link with body mass index [290]. The paper on competition climbers says research shows no clear link between body composition and performance and doesn’t support the belief that a lower weight helps climbers already at an appropriate weight [289]. One small study compared ten elite Polish boulderers with untrained students and found them light, meaning low in body fat [272].
Some climbers still diet: in a survey of elite women, 45% said they try to change their competition weight [291]. The competition paper says climbers generally believe dieting will raise their strength for their weight, and so their performance [289]. The arithmetic is simple: if your strength holds, a lower weight raises your strength relative to bodyweight. Across climbers, that ratio tracks grade in many studies [279]. But the ratio has body mass built into it, and these studies too compare different climbers (this book’s reading). We found no test in climbers of whether strength holds while you diet, or whether a better ratio then brings grades.
The evidence on injury is mixed. In a survey of Swedish climbers, being overweight and bouldering both went with a higher risk of a first injury. The authors asked for more study [292]. A survey of 389 Czech and Slovak climbers found no effect of weight on how many injuries they had or how bad they were, and no link with a last injury in bouldering. Heavier climbers more often had their last injury while lead climbing on a rope, and less often on indoor walls. The authors connect the rope injuries to falls onto rock [293]. A survey of 667 climbers found no link between body mass index and long-term injury or level [294]. One knee-injury study wonders, without testing it, whether age and weight help explain why some climbers needed surgery [150].
This book’s view: at V3–V5, technique and finger strength hold you back more than a few kilos. Better footwork lowers the load on your fingers today, and dieting for weight loss carries real health risks (see the box below).
9.4 Starting as an adult
Tendons and pulleys adapt slowly
Muscles adapt to training within weeks, but tendons (the cords that join muscles to bones) take longer [297]. Human tendon renews only about 0.2–1% of its collagen (the protein it is made of) each day. The core of an adult tendon, laid down by your late teens, hardly changes at all [298]. Climbing studies agree: when researchers scanned the fingers of 31 high-level climbers twice, ten years apart, their pulleys (the bands that hold the finger tendons against the bone) and tendons had kept getting thicker [286]. Lattice’s rule of thumb, a coaching figure rather than a measurement, is that tendons may take five times as long as muscle to get stronger [277].
Age itself matters less than you might fear. Tendon cells lose little of their ability to build new tissue as you age. In animal studies, training reverses several effects of ageing [298]. The real issue is timing. After a year, your muscles and skill can ask more of your fingers than your pulleys can take. The danger is a sudden jump in finger load, e.g. from full crimps on small edges, catching holds at speed, hard sessions on back-to-back days or a campus board (wooden rungs you climb with your hands only).
The injuries that actually happen
The picture depends on where the data come from: finger and shoulder problems usually go to a physiotherapist, while ankle and knee injuries go to the emergency department.
| Type | What the data show | What it means for you |
|---|---|---|
| Fingers | A study followed 426 indoor climbers for a year. Fingers were the most common site of arm and hand injuries, with 36%. Each year of age raised the odds by 3%. A previous injury tripled them. Campus-board use more than doubled them [299]. In climbers aged 35 and over, pulley injuries headed the list of diagnoses [300]. | Protect your pulleys from sudden overload. Your first finger injury matters most: it makes the next one more likely. |
| Shoulders | Two shoulder problems are in the top five diagnoses for over-35s. In shoulder impingement, a tendon gets pinched under the shoulder blade. A SLAP tear is a tear in the rim of the shoulder socket [300]. In a small indoor bouldering study, 26% had a shoulder injury [288]. | Build up big dynamic moves gradually. Keep your shoulders set (pulled down and back) when you catch a hold (this book’s suggestion). |
| Ankles and knees | Most gym bouldering accidents are falls onto the mat, often with a twisted ankle or leg [301]. In one hospital’s emergency department, the ankle was hurt in 37% of bouldering injuries and the knee in 17% [302]. Older climbers who reach an emergency department are admitted more often [303]. | Learn to fall (Section 9.6). This may be the injury you can most easily prevent (judgement). |
Studies of boulderers agree that fingers and ankles are among the most common injuries [293, 304].
Warming up
No study shows that warming up prevents bouldering injuries. In the knee-injury study, four in five of the injured climbers already had a warm-up routine [150]. With no uninjured climbers to compare, that can’t show whether warming up helps (this book’s reading). In a small study, foam rolling and static stretching didn’t change climbing performance [305]. Warm-up advice comes from coaches and federations: the German Alpine Club makes a thorough warm-up its first bouldering rule [306]. The routine below is this book’s suggestion, built from that advice.
| Step | Time | What to do |
|---|---|---|
| 1. Pulse | 5 min | Easy cardio: rowing, skipping or brisk stairs [307]. |
| 2. Mobility | 5 min | Swing through your range; don’t hold stretches. Do arm circles, hip circles, deep squats and leg swings. Held stretches before climbing reduce strength [307]. Over 40, try tendon glides (finger positions that slide the tendons through their full range) [308]. |
| 3. Landings | 2 min | Jump 3–5 times from standing onto the mat. Land, sit back and roll. It wakes your ankles [309] and rehearses Section 9.6. |
| 4. Easy climbing | 10–15 min | Problems 3–4 grades below your best. Big holds first, then smaller ones; steep walls last [307, 310]. Silent feet on every problem. |
| 5. Rehearsal | 5 min | 2–3 problems one grade below today’s target, with the same kinds of move. |
| 6. Re-warm | — | Warm up again after any break of more than 15 minutes [310]. |
When finger training makes sense
A fingerboard is a board of edges you hang from to train your fingers. After a year of climbing, you will hear advice from “start now” to “wait another year”. Both camps have a case.
The traditional view: build up first. Eric Hörst (2011) says the fingerboard is not for true novices. Start only after six months of climbing, with no finger, elbow or shoulder pain, and not while more than about 9 kg overweight [311]. Climbing.com suggests climbing for a year or two first. Novices can hang at low loads, but beginners should not add weight [312]. Lattice puts skill first. It suggests testing a 7-second hang on a 20 mm edge after six months, and prefers long, light hangs to maximal ones [277].
The newer view: some coaches start gentle loading earlier. One retrospective study used the logs of 526 users of the Crimpd training app. The gentle protocol, which the paper calls “Abrahangs”, takes about 10 minutes: 10-second hangs with the feet on the floor and only “a small strain” in the forearms. The paper declares that its co-author Emil Abrahamsson created the protocol and that another co-author designed the app. Climbers chose their own training and ran it unsupervised, and nobody measured the load on the gentle hangs, so it isn’t proof. The study also started from climbers who had logged at least 30 gentle workouts. Strength relative to bodyweight rose by 2.5% on average with gentle hangs and by 3.2% with near-maximal hangs, and those gains didn’t differ significantly. The gentle gain also wasn’t significantly bigger than the result for climbers below the study’s cut-offs (under 3 gentle or 0.5 maximal sessions a week). Those climbers showed no change over the 4–16 weeks, though nobody tracked their climbing or their other finger training. Doing both protocols added up (5.8%). The users were intermediate to elite, so the study says nothing direct about novices. The authors warn that maximal hangs may overload novices [313].
In a randomised trial with advanced climbers, hangs at 60% of maximum built less strength than heavier ones, but the authors suggest them for climbers worried about injury [314]. Dave MacLeod says circumstances matter more than grade: fingerboarding can suit novices who can’t climb often [315]. Lattice coach Ollie Torr uses gentle hangs even with complete beginners, and keeps one day a week free of finger training [316].
Where they agree: nobody suggests heavy hangs with added weight, or campus boarding, one year in.
Recovery and rest
Lattice coach Tom Randall finds that past 40 he needs more recovery, so he has cut back on days with two sessions. On climbing trips he has swapped “two days on, one off” for “one on, one off” or “two on, two off” [317]. A Climbing.com plan for over-40s has two rest days a week [308]. Tendons respond slowly, so treat finger pain the day after a session as the signal to back off. After a week or two off, restart easier: tendons lose stiffness within one or two weeks without load [298].
This book’s suggestion: three bouldering sessions a week, never more than two days in a row. Make one of them an easy session of drills (Section 9.5).
9.5 Learning technique
What skill looks like
A review of 42 studies describes what skilled climbers do. They pause briefly, take a direct path up the wall and move smoothly. They see more of what each hold offers and waste fewer touches on holds they don’t use [318]. Researchers measure smoothness by the jerk of the hips (how abruptly they speed up and slow down) [319, 320].
You can check the same things on video. Do your hips jerk or stall? Is their path direct, or does it wander? How long do you hang still before each move?
Principles to try
- Practise with a goal. Deliberate practice means a clear goal, quick feedback and tasks you can repeat at a slowly rising level. In sport it explains a real but modest share of skill, about 18% [321]. Give each session one or two named goals, such as backsteps on the steep wall, then choose problems that need them. How much you learn depends on how hard a problem is for you, not on its grade [318].
- Vary what you practise. Variable practice means changing the task a little each time. In one study, climbers on routes with holds that could be gripped two ways explored more, then settled into smooth movement. A new route made them explore again [322]. Beginners who only climbed square to the wall improved suddenly once they found side-on positions [319]. Varied practice can make sessions feel worse while you keep more of what you learn [323]. So re-climb problems you’ve done with a new body position, new feet or a hold banned.
- Learn where you feel safe. Fear narrows what you notice and try [324]. Try new positions low down on easy problems, not at the top of your hardest one.
- Try thinking about the hold, not your body. In research on how people learn movements, a 2013 review found that an external focus, a cue about the effect of a move, beats a cue about the body [325]. In climbing that might mean “push the foothold down into the wall” instead of “straighten your knee” (this book’s examples). A 2024 re-analysis of this research allowed for studies with no effect going unpublished, and found the average advantage small to nil. The effect varied between studies for reasons nobody can yet explain [326]. We found no climbing study of it. So treat a hold-focused cue as something to try: use the body-part steps in this book to set up a position on the ground, then climb with one cue in mind and keep it if it helps (this book’s suggestion).
- Get feedback, but not after every go. Learners in one study got feedback on their movement after each session [319]. Too much feedback during practice can make you depend on it [323]. Film a few attempts, then watch them.
Video, flashing and repeating
Film from behind, 3–4 m back, or from the side on steep walls. Watch after two or three attempts. Look for one thing per viewing:
- Were your hips over your feet before each hand moved?
- How many times did you readjust a foot?
- Where did you pause for more than two seconds?
- Did you swing off like a door (Barn door)?
- Could you hear your feet land?
Reading a problem before you climb it can mean fewer and shorter stops [24, 322]. Repeating a problem makes you smoother; new problems make you explore [318, 322]. So do both in every session (this book’s suggestion):
- Flash block. Try 3–5 new problems you might flash (climb first try). Read each one for a minute or two with the method in Chapter 2. Then climb and compare. A German Alpine Club gym uses this “discuss, climb, compare” exercise in its beginner course [327].
- Repeat block. Repeat 2–3 problems you’ve recently done. Aim for fewer pauses, no foot readjustments and silent feet.
Watch others. Novice climbers can pick up new ways to use holds just by watching a video of a skilled climber [328]. Watch where their hips go and which way they face before each move.
Drills
Do drills on problems two or three grades below your best [329], or on the gym’s easiest if you haven’t got that far. Try one session a week of 25–40 easy problems (this book’s suggestion). Lattice argues that easy, continuous climbing teaches relaxed movement [330]. The evidence it cites is about forearm fitness, though, not technique.
The Level column gives the grade where each drill starts to pay off (this book’s suggestion). A drill can also train a technique whose badge comes later.
| Drill | Level | How | Trains |
|---|---|---|---|
| Silent feet | V0 | Place each foot without a sound. If you hear it, step back and redo it. Do 20 footholds [329]. | Precise footwork |
| Sticky feet | V0 | Once a foot touches a hold, don’t readjust it. Pivoting is allowed [329]. | Precise footwork, Edging |
| Foothold stare | V0 | Watch the foothold until your foot lands. Keep watching for 3 seconds [329]. | Precise footwork |
| Climb down | V0 | Climb each warm-up problem back down. It trains hand and foot coordination in reverse [329, 331]. | Precise footwork, Foot swap, Lock-off |
| Leg traverse | V0 | Traverse 9–12 m. Push with your legs and use your arms as little as you can [329]. Keep them straight on a steep wall and stand tall on a vertical one. | Straight arms, Traverses |
| Toe stab | V1 | Stand on one leg off the wall. Tap your big toe precisely onto holds, 20 per foot [329]. | Front-pointing |
| No-hands slab | V1 | Climb an easy slab holding tennis balls, or with no hands [329]. Stay low on the wall (this book’s suggestion). | Smearing, Slab technique |
| Hover hands | V2 | Before you grab the next hold, hold your hand still in front of it for about 3 seconds. If you can’t, your hips are wrong. Fix your feet or hips first [332]. | Turning the hip in, Side flag |
| Banned hold | V2 | Repeat a problem you’ve done with one key foothold banned. | Smearing, Side flag |
| New beta | V2 | Climb a problem you’ve done with three different betas (sequences of moves): square on, side on, then with different feet [319, 322]. | Frog position, Turning the hip in, Backstep, Drop knee |
A ladder for any technique
Here is one way to learn any technique, with a test for when you have it. Both are this book’s suggestion, not a tested method. Each entry’s warnings still apply at every step, so warm up first and stop if something hurts. A full crimp isn’t something to repeat until it feels normal. Build up jumps slowly instead: a few goes at a time, low on the wall and on big holds.
- On its own. Find one move that needs the technique, low on an easy wall. Repeat it on both sides until it stops feeling strange.
- On easy problems. Use it on problems about two grades below your best (the gym’s easiest, if you haven’t got that far), where you can get it wrong and still stay on.
- At your limit. Try it on problems near your best grade, where you have to choose it while the climbing is hard.
You have it once you can say yes to three questions. Can you spot from the ground where it’s needed? Does it work first go on a problem you haven’t tried? Does it still come to you late in a session, on an easy problem? Don’t test a deep drop knee, a full crimp or a big jump when you’re tired, because they are riskier then.
9.6 Falling and landing safely
Why it matters
Most serious bouldering injuries come from landings, not from climbing. The DAV (German Alpine Club) collects reports of gym accidents that needed an ambulance or caused at least a moderate injury. In its 2025 figures, 89% of bouldering accidents were falls onto the mat. In 46% of those falls, an ankle or leg twisted on landing. In 27%, the climber landed on an arm. 17% happened at or near the top hold [301]. A survey of 245 injured boulderers found that:
- 85% of the falls were unplanned. Most came from slipping feet, jumps and missed holds.
- 62% of the falls involved a twist. 74% ended feet first.
- Falls from low on the wall were far less likely to cause a severe injury than falls from the top.
- 94% landed on the mats, so missing mats weren’t the problem [232].
In a study of knee injuries, the climbers with a torn ACL all described an uncontrolled fall [150]. The ACL is the main ligament inside the knee: a tough band that holds the joint together. The DAV says climbers must train climbing down, falling and landing [301]. One DAV gym teaches falling in the first session of its beginner course and repeats it every session [327].
How to land
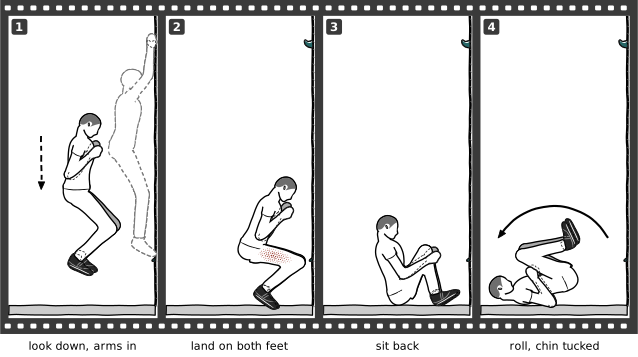
- Look down as you come off. Find the landing. Spotting it early speeds up your reaction [333].
- Push slightly away from the wall. You won’t scrape down it or catch a foot on a hold [334].
- Land on both feet at once, knees bent and springy [309]. Sources disagree on how wide to put your feet: together [306], or shoulder-width or wider [309, 331]. This book suggests hip-width. Landing on both feet matters more than the width.
- Keep absorbing. Sit back onto your bum just behind your heels. Then roll backwards onto a rounded back (Figure 96) [333, 334].
- Tuck your arms in and hold your head. Bend your arms and keep them close to your body. Tense your neck so your head stays off the mat. German coaches call this the Babyboxer position [331]. The authors of the fall survey suggest crossing your arms in front and rolling backwards [232].
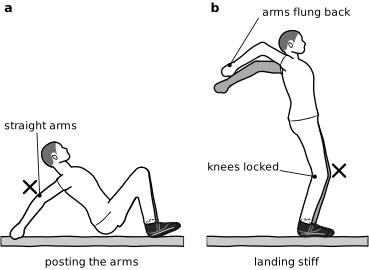
- Never put your hands down behind you. Don’t land on straight arms (Figure 97) [287, 309, 334]. The fall survey’s authors think many elbow injuries come from bracing with the arms after falling backwards [232].
- Don’t go limp or rigid. Limp risks whiplash. Rigid risks damage to tendons and ligaments [335].
Not every source agrees about the arms. One guide says to let your bent arms soak up the last of the impact [310]. Petzl allows a judo-style slap on the mat [334]. The injury data favour tucking them in.
Climb down rather than jump
The DAV’s rule is to climb down before you jump, using the holds marked for climbing down, and to roll if you need to [306]. Every jump loads your tendons, ligaments and joints. Where your gym marks no descent holds, any holds will do for climbing down [331]. Before you start a problem, check that you can climb down or jump safely. Climb only as high as you are ready to fall [331].
If you’re tall, your body starts higher than a short climber’s from the same foothold, so every drop is bigger. This book’s suggestion: climb down until your feet are about 1 m above the mat. Then drop and land as above.
Bailing from dynos and big moves
To bail is to let go on purpose when a move fails. Jumps cause about a fifth of the falls that injure boulderers [232]. They also cause twisting falls that are hard to control [310]. The DAV recorded climbers landing on or hitting volumes (big hollow shapes bolted to the wall) during jumps [301]. It asks setters not to put the hardest move at full height, especially a jump to the side [336]. Before you try a dyno, double dyno or run-and-jump:
- Plan the miss before the go. Is the landing clear of people, bags and brushes? Is there a volume or big hold below the move that you could hit [301]?
- Know how to get out of every hook. Before a heel hook above your head, ask yourself: would it release if a hand slipped [310]? If not, set the heel lightly or choose another sequence.
- Commit fully or don’t go. A half-hearted jump often ends with one hand on and your body swinging. (This book’s suggestion.)
- If you miss, let go with both hands together. Bring your arms in. Hanging on with one hand swings you round, so you land twisted. (This book’s suggestion. Twisting featured in 62% of falls that caused injury [232].)
- If your feet swing off and you can’t hold the swing, let go as your body swings back under the holds. You then drop straight down instead of flying out backwards. See Cutting loose and swing control. (This book’s suggestion.)
- Don’t flail. Turning round or spreading your arms in the air makes the landing harder to control [334]. Look down, get your legs under you and land as above.
Mats, gaps and the fall zone
- Keep the area you could land in clear. No bottles, brushes, chalk bags or people on the mat below a climber. Don’t climb right beside or above someone. Judge your landing area generously [306, 310].
- Watch the mat edges. Landing on an edge or a seam can twist an ankle. Check loose pads after every fall [310]. Still, only 5% of injured boulderers in the fall survey landed in a gap [232].
- Look for things to hit. 3% of the DAV’s reported bouldering accidents were impacts with the wall or a volume [301].
Spotting indoors
A spotter stands below a climber and guides their fall so they land feet first. You guide the climber; you don’t catch them [310, 334]. Stand with your feet apart and knees soft. Bend your arms and hold your hands at hip height. Aim at the climber’s hips and upper back. Tuck your thumbs in [310, 334].
On modern gym floors, the Climbing Wall Association’s experts see little need for routine spotting. It doesn’t prevent the common ankle and wrist injuries, and an untrained spotter can do harm or get hurt. Spotting still helps in low, steep caves, on roofs and on hooks that could tip you upside down. The experts’ favourite advice was to teach falling instead [337]. The DAV says to learn to spot properly, to spot only when needed and to allow for weight differences [306]. If you’re tall and heavy, you are hard for a smaller partner to guide [334]. Rely on your own landing.
Practise falling
This progression comes from a DAV national instructor [331]:
- On the mat, from standing: tip backwards into the Babyboxer and roll.
- Jump up, land on both feet, tip back and roll.
- With a partner: face each other, hold hands and bend your knees. Lean back against each other’s pull. Let go and land in the Babyboxer.
- On the wall: drop off from low holds. Go gradually higher. Slightly overhanging walls are fine; roofs are not.
Practise often so the right reflexes become automatic. Make a few landings a regular part of your warm-up [309].